多节点测试
多节点 CI 旨在测试超大规模模型的分布式场景,例如:跨多个节点的解耦式预填充(disaggregated_prefill)多数据并行(DP)等。
工作原理
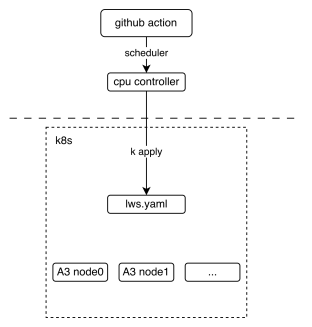
下图展示了多节点 CI 机制的基本部署视图,说明了 GitHub Action 如何与 lws(一种 Kubernetes CRD 资源)交互。
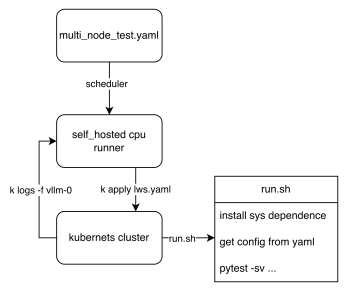
从工作流的角度,我们可以看到最终测试脚本的执行过程。关键在于共享文件 tests/e2e/nightly/multi_node/scripts/lws.yaml.jinja2 和 tests/e2e/nightly/multi_node/scripts/run.sh,它们分别定义了集群模板和 Pod 入口脚本。每个节点根据 LWS_WORKER_INDEX 环境变量执行不同的逻辑,从而使多个节点能够组成分布式集群来执行任务。run.sh 根据配置路径选择 pytest 入口点:内部 DP 配置使用 internal_dp/scripts/test_multi_node.py,外部 DP 配置使用 external_dp/scripts/test_external_dp.py。
如何贡献
- 上传自定义权重
如果您需要自定义权重,例如为 DeepSeek-V3 量化了 w8a8 权重并希望在 CI 上运行,欢迎将权重上传至 ModelScope 的 vllm-ascend 组织。如果您没有上传权限,请联系 @Potabk。
-
添加配置文件
对于常规的内部 DP 多节点流程,将配置文件添加到
tests/e2e/nightly/multi_node/internal_dp/config/,例如DeepSeek-V3.yaml。外部 DP 用例使用独立的tests/e2e/nightly/multi_node/external_dp/config/目录,并应通过工作流中的config_base_path或本地的CONFIG_BASE_PATH传递该目录。假设您有 2个节点 运行 1P1D 配置(1个预填充器 + 1个解码器):
您可以添加一个类似这样的配置文件:
test_name: "test DeepSeek-V3 disaggregated_prefill" # the model being tested model: "vllm-ascend/DeepSeek-V3-W8A8" # how large the cluster is num_nodes: 2 npu_per_node: 16 # All env vars you need should add it here env_common: &env_common VLLM_USE_MODELSCOPE: true OMP_PROC_BIND: false OMP_NUM_THREADS: 100 HCCL_BUFFSIZE: 1024 SERVER_PORT: 8080 disaggregated_prefill: enabled: true # node index(a list) which meet all the conditions: # - prefiller # - no headless(have api server) prefiller_host_index: [0] # node index(a list) which meet all the conditions: # - decoder decoder_host_index: [1] # Add each node's vllm serve cli command just like you run locally # Add each node's individual envs like follow deployment: - name: prefiller node # optional: just for description, not used in code envs: <<: *env_common VLLM_ASCEND_ENABLE_FLASHCOMM1: 1 # Continue to add other envs if needed server_cmd: > vllm serve ... - name: decoder node # optional: just for description, not used in code envs: <<: *env_common VLLM_ASCEND_ENABLE_FLASHCOMM1: 1 # Continue to add other envs if needed server_cmd: > vllm serve ... benchmarks: perf: # fill with performance test kwargs acc: # fill with accuracy test kwargs -
Add the case to nightly workflow
Currently, the multi-node test workflow is defined in .github/workflows/schedule_nightly_test_a3.yaml 中。
multi-node-tests:
  name: multi-node
  if: always() && (github.event_name == 'schedule' || github.event_name == 'workflow_dispatch')
  strategy:
    fail-fast: false
    max-parallel: 1
    matrix:
      test_config:
        - name: multi-node-deepseek-pd
          config_file_path: DeepSeek-V3.yaml
          size: 2
        - name: multi-node-qwen3-dp
          config_file_path: Qwen3-235B-A22B.yaml
          size: 2
        - name: GLM5_1-W8A8-EP-external
          config_file_path: GLM5_1-W8A8-EP-external.yaml
          config_base_path: tests/e2e/nightly/multi_node/external_dp/config/
          size: 4
  uses: ./.github/workflows/_e2e_nightly_multi_node.yaml
  with:
    soc_version: a3
    runner: linux-aarch64-a3-0
    image: 'swr.cn-southwest-2.myhuaweicloud.com/base_image/ascend-ci/vllm-ascend:nightly-a3'
    replicas: 1
    size: ${{ matrix.test_config.size }}
    config_file_path: ${{ matrix.test_config.config_file_path }}
    config_base_path: ${{ matrix.test_config.config_base_path || '' }}
    name: ${{ matrix.test_config.name }}
  secrets:
    KUBECONFIG_B64: ${{ secrets.KUBECONFIG_B64 }}
The matrix above defines all the parameters required to add a multi-machine use
case. The parameters worth noting are size, config_file_path, and
config_base_path. size defines the number of nodes required for your use
case. config_file_path is the yaml file name, and config_base_path tells the
loader which config directory to use. For internal DP cases, use an empty
config_base_path so the loader uses its default internal DP config directory.
For external DP cases, set it to
tests/e2e/nightly/multi_node/external_dp/config/.
本地运行多节点测试
1.使用 Kubernetes
本节假定您本地已有一个 Kubernetes NPU 集群环境。这样您就可以轻松一键启动我们的测试。
-
步骤 1.安装 LWS CRD 资源
-
步骤 2.按需部署以下
lws.yaml文件apiVersion: leaderworkerset.x-k8s.io/v1 kind: LeaderWorkerSet metadata: name: test-server namespace: vllm-project spec: replicas: 1 leaderWorkerTemplate: size: 2 restartPolicy: None leaderTemplate: metadata: labels: role: leader spec: containers: - name: vllm-leader imagePullPolicy: Always image: swr.cn-southwest-2.myhuaweicloud.com/base_image/ascend-ci/vllm-ascend:nightly-a3 env: - name: CONFIG_YAML_PATH value: DeepSeek-V3.yaml - name: CONFIG_BASE_PATH value: tests/e2e/nightly/multi_node/internal_dp/config/ - name: WORKSPACE value: "/vllm-workspace" - name: FAIL_TAG value: FAIL_TAG command: - sh - -c - | bash /vllm-workspace/vllm-ascend/tests/e2e/nightly/multi_node/scripts/run.sh resources: limits: huawei.com/ascend-1980: 16 memory: 512Gi ephemeral-storage: 100Gi requests: huawei.com/ascend-1980: 16 memory: 512Gi ephemeral-storage: 100Gi cpu: 125 ports: - containerPort: 8080 # readinessProbe: # tcpSocket: # port: 8080 # initialDelaySeconds: 15 # periodSeconds: 10 volumeMounts: - mountPath: /root/.cache name: shared-volume - mountPath: /usr/local/Ascend/driver/tools name: driver-tools - mountPath: /dev/shm name: dshm volumes: - name: dshm emptyDir: medium: Memory sizeLimit: 15Gi - name: shared-volume persistentVolumeClaim: claimName: nv-action-vllm-benchmarks-v2 - name: driver-tools hostPath: path: /usr/local/Ascend/driver/tools workerTemplate: spec: containers: - name: vllm-worker imagePullPolicy: Always image: swr.cn-southwest-2.myhuaweicloud.com/base_image/ascend-ci/vllm-ascend:nightly-a3 env: - name: CONFIG_YAML_PATH value: DeepSeek-V3.yaml - name: CONFIG_BASE_PATH value: tests/e2e/nightly/multi_node/internal_dp/config/ - name: WORKSPACE value: "/vllm-workspace" - name: FAIL_TAG value: FAIL_TAG command: - sh - -c - | bash /vllm-workspace/vllm-ascend/tests/e2e/nightly/multi_node/scripts/run.sh resources: limits: huawei.com/ascend-1980: 16 memory: 512Gi ephemeral-storage: 100Gi requests: huawei.com/ascend-1980: 16 ephemeral-storage: 100Gi cpu: 125 volumeMounts: - mountPath: /root/.cache name: shared-volume - mountPath: /usr/local/Ascend/driver/tools name: driver-tools - mountPath: /dev/shm name: dshm volumes: - name: dshm emptyDir: medium: Memory sizeLimit: 15Gi - name: shared-volume persistentVolumeClaim: claimName: nv-action-vllm-benchmarks-v2 - name: driver-tools hostPath: path: /usr/local/Ascend/driver/tools --- apiVersion: v1 kind: Service metadata: name: vllm-leader namespace: vllm-project spec: ports: - name: http port: 8080 protocol: TCP targetPort: 8080 selector: leaderworkerset.sigs.k8s.io/name: vllm role: leader type: ClusterIPVerify the status of the pods:
Should get an output similar to this:
Verify that the distributed inference works:
Should get something similar to this:
INFO 12-30 11:00:57 [__init__.py:43] Available plugins for group vllm.platform_plugins:
INFO 12-30 11:00:57 [__init__.py:45] - ascend -> vllm_ascend:register
INFO 12-30 11:00:57 [__init__.py:48] All plugins in this group will be loaded. Set `VLLM_PLUGINS` to control which plugins to load.
INFO 12-30 11:00:57 [__init__.py:217] Platform plugin ascend is activated
INFO 12-30 11:00:57 [importing.py:68] Triton not installed or not compatible; certain GPU-related functions will not be available.
================================================================================================== test session starts ===================================================================================================
platform linux -- Python 3.12.13, pytest-8.4.2, pluggy-1.6.0 -- /usr/local/python3.12.13/bin/python3
cachedir: .pytest_cache
rootdir: /vllm-workspace/vllm-ascend
configfile: pyproject.toml
plugins: cov-7.0.0, asyncio-1.3.0, mock-3.15.1, anyio-4.12.0
asyncio: mode=Mode.STRICT, debug=False, asyncio_default_fixture_loop_scope=None, asyncio_default_test_loop_scope=function
collected 1 item

tests/e2e/nightly/multi_node/internal_dp/scripts/test_multi_node.py::test_multi_node [2025-12-30 11:01:01] INFO multi_node_config.py:294: Loading config yaml: tests/e2e/nightly/multi_node/internal_dp/config/DeepSeek-V3.yaml
[2025-12-30 11:01:01] INFO multi_node_config.py:348: Resolving cluster IPs via DNS...
[2025-12-30 11:01:01] INFO multi_node_config.py:212: Node 0 envs: {'VLLM_USE_MODELSCOPE': 'True', 'OMP_PROC_BIND': 'False', 'OMP_NUM_THREADS': '100', 'HCCL_BUFFSIZE': '1024', 'SERVER_PORT': '8080', 'NUMEXPR_MAX_THREADS': '128', 'DISAGGREGATED_PREFILL_PROXY_SCRIPT': 'examples/disaggregated_prefill_v1/load_balance_proxy_server_example.py', 'HCCL_IF_IP': '10.0.0.102', 'HCCL_SOCKET_IFNAME': 'eth0', 'GLOO_SOCKET_IFNAME': 'eth0', 'TP_SOCKET_IFNAME': 'eth0', 'LOCAL_IP': '10.0.0.102', 'NIC_NAME': 'eth0', 'MASTER_IP': '10.0.0.102'}
[2025-12-30 11:01:01] INFO multi_node_config.py:159: Launching proxy: python examples/disaggregated_prefill_v1/load_balance_proxy_server_example.py --host 10.0.0.102 --port 6000 --prefiller-hosts 10.0.0.102 --prefiller-ports 8080 --decoder-hosts 10.0.0.138 --decoder-ports 8080
[2025-12-30 11:01:01] INFO conftest.py:107: Starting server with command: vllm serve vllm-ascend/DeepSeek-V3-W8A8 --host 0.0.0.0 --port 8080 --data-parallel-size 2 --data-parallel-size-local 2 --tensor-parallel-size 8 --seed 1024 --enforce-eager --enable-expert-parallel --max-num-seqs 16 --max-model-len 8192 --max-num-batched-tokens 8192 --quantization ascend --trust-remote-code --no-enable-prefix-caching --gpu-memory-utilization 0.9 --kv-transfer-config {"kv_connector": "MooncakeConnectorV1", "kv_role": "kv_producer", "kv_port": "30000",
"kv_connector_extra_config": {
        "prefill": {
                "dp_size": 2,
                "tp_size": 8
        },
        "decode": {
                "dp_size": 2,
                "tp_size": 8
        }
    }
}
2. Test without Kubernetes
The same tests/e2e/nightly/multi_node/scripts/run.sh entrypoint can be used
on prepared bare-metal or container hosts. Without LWS, set the values that
Kubernetes normally injects yourself:
cluster_hostsin the config yaml, using IPs reachable from every node.LWS_WORKER_INDEXon each node, starting from0.CONFIG_YAML_PATHas the config file name andCONFIG_BASE_PATHas the config directory.
Use the host NIC IPs that can reach each other, for example addresses shown by
ip addr or ifconfig on the active network interface. Do not use per-host
Docker bridge addresses such as 172.17.0.1, because each host has its own
local bridge.
Local cluster_hosts edits should be removed before submitting a PR unless the
hosts are part of a committed test environment.
2.1 内部 DP 本地运行
2.1.1 添加集群主机
编辑您要运行的内部 DP 配置,例如:
Add cluster_hosts as a top-level field, for example near num_nodes and
npu_per_node:
2.1.2 准备环境
在每个集群主机上安装 vllm-ascend 开发依赖:
Install AISBench on the first host, which is the node with
LWS_WORKER_INDEX=0:
export AIS_BENCH_TAG="v3.1-20260330-master"
export AIS_BENCH_URL="https://github.com/AISBench/benchmark.git"
export BENCHMARK_HOME=/vllm-workspace/vllm-ascend/benchmark

git clone -b ${AIS_BENCH_TAG} --depth 1 ${AIS_BENCH_URL} $BENCHMARK_HOME
cd $BENCHMARK_HOME
pip install -e . -r requirements/api.txt -r requirements/extra.txt
If your local image already contains the model, benchmark data, Ascend runtime, and AISBench, you only need the run-time exports in the next step.
2.1.3 启动每个节点
Run the script on each node separately. Start worker nodes first, then start node 0.
在节点 1 上:
export WORKSPACE=/vllm-workspace
export IS_PR_TEST=false
export CONFIG_YAML_PATH=DeepSeek-V3.yaml
export CONFIG_BASE_PATH=tests/e2e/nightly/multi_node/internal_dp/config/
export LWS_WORKER_INDEX=1

cd $WORKSPACE/vllm-ascend
bash tests/e2e/nightly/multi_node/scripts/run.sh
在节点 0 上:
export WORKSPACE=/vllm-workspace
export IS_PR_TEST=false
export CONFIG_YAML_PATH=DeepSeek-V3.yaml
export CONFIG_BASE_PATH=tests/e2e/nightly/multi_node/internal_dp/config/
export LWS_WORKER_INDEX=0

cd $WORKSPACE/vllm-ascend
bash tests/e2e/nightly/multi_node/scripts/run.sh
Internal DP logs are mainly printed to the terminal running run.sh. When
LOG_PREFIX is set, the shared script also backs up Ascend logs to:
2.2 外部 DP 本地运行
2.2.1 添加集群主机
编辑您要运行的外部 DP 配置。例如:
Add cluster_hosts as a top-level field, for example near num_nodes and
npu_per_node:
2.2.2 准备环境
在每个集群主机上安装 vllm-ascend 开发依赖:
在节点 0 上安装 AISBench:
export AIS_BENCH_TAG="v3.1-20260330-master"
export AIS_BENCH_URL="https://github.com/AISBench/benchmark.git"
export BENCHMARK_HOME=/vllm-workspace/vllm-ascend/benchmark

git clone -b ${AIS_BENCH_TAG} --depth 1 ${AIS_BENCH_URL} $BENCHMARK_HOME
cd $BENCHMARK_HOME
pip install -e . -r requirements/api.txt -r requirements/extra.txt
If your local image already contains the model, benchmark data, Ascend runtime, and AISBench, you only need the run-time exports in the next step.
2.2.3 启动每个节点
External DP uses the same shared run.sh. Set CONFIG_BASE_PATH to the
external DP config directory so the script chooses
external_dp/scripts/test_external_dp.py.
Then start non-master nodes first, and start node 0 last. The following example
uses GLM5_1-W8A8-EP-external.yaml, which is a 4-node disaggregated prefill
case.
在节点 1、节点 2 和节点 3 上,设置匹配的 LWS_WORKER_INDEX:
export WORKSPACE=/vllm-workspace
export IS_PR_TEST=false
export CONFIG_BASE_PATH=tests/e2e/nightly/multi_node/external_dp/config/
export CONFIG_YAML_PATH=GLM5_1-W8A8-EP-external.yaml
export LWS_WORKER_INDEX=1  # Use 2 on node 2, and 3 on node 3.

cd $WORKSPACE/vllm-ascend
bash tests/e2e/nightly/multi_node/scripts/run.sh
在节点 0 上:
export WORKSPACE=/vllm-workspace
export IS_PR_TEST=false
export CONFIG_BASE_PATH=tests/e2e/nightly/multi_node/external_dp/config/
export CONFIG_YAML_PATH=GLM5_1-W8A8-EP-external.yaml
export LWS_WORKER_INDEX=0

cd $WORKSPACE/vllm-ascend
bash tests/e2e/nightly/multi_node/scripts/run.sh
For GLM5_1-W8A8-EP-external.yaml, node 0 and node 1 start prefiller ranks,
node 2 and node 3 start decoder ranks, and node 0 also starts the proxy and
benchmark.
2.2.4 在测试运行时读取日志
The terminal running run.sh prints pytest orchestration logs. For external DP,
AISBench output is also printed on node 0, while rank and proxy stdout/stderr
are written to EXTERNAL_DP_LOG_DIR. The default layout is:
The first line of each rank log records the exact command and environment used
to start that rank. proxy.log exists only on the configured proxy node,
usually node 0.
在本地运行多个实验时,请使用单独的日志目录:
To watch logs in real time, run these commands in another terminal on the corresponding node: