多节点分布式处理(DeepSeek)#
快速开始#
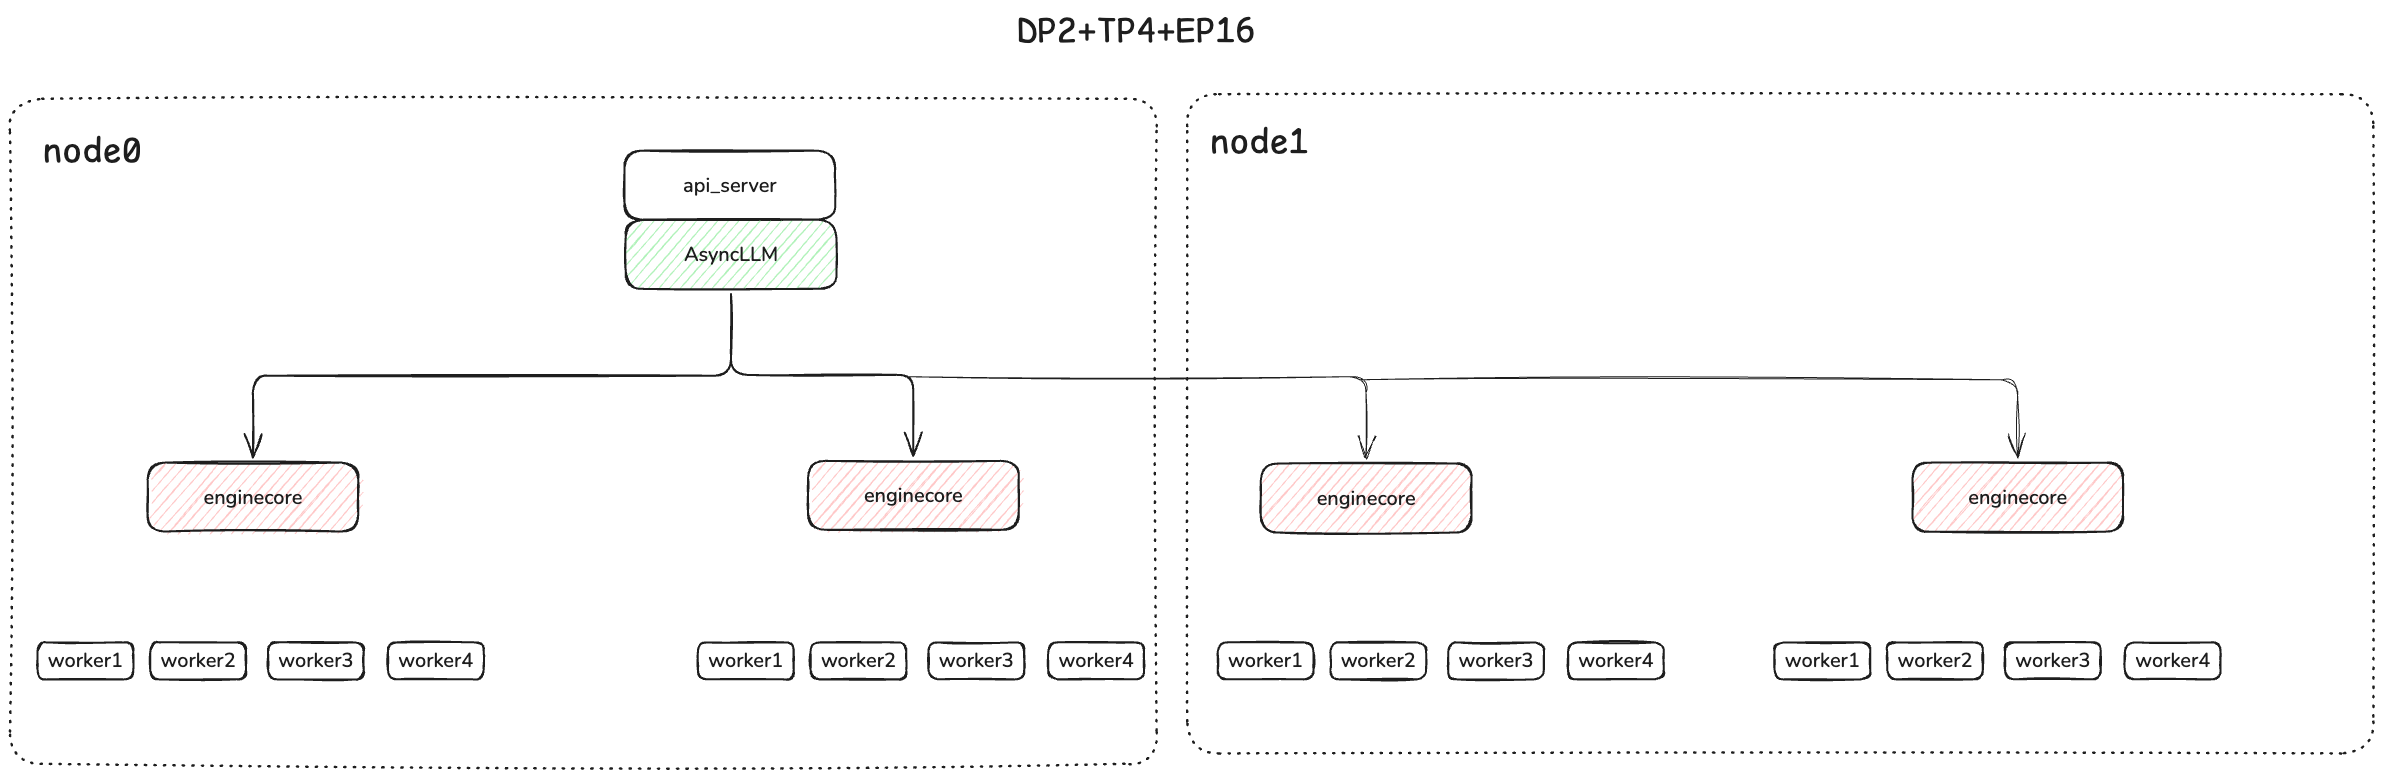
vLLM-Ascend 现在支持数据并行(DP)部署,可以在多个 NPU 或实例之间复制模型权重,每个实例处理独立的请求批次。这对于在保证高资源利用率的同时,实现跨设备的吞吐量扩展特别有用。
每个 DP 进程作为一个单独的“核心引擎”进程部署,并通过 ZMQ 套接字与前端进程通信。数据并行可以与张量并行结合使用,此时每个 DP 引擎拥有数量等于 TP 大小的每 NPU 工作进程。
对于混合专家(Mixture-of-Experts, MoE)模型——尤其是像 DeepSeek 这样采用多头潜在注意力(Multi-head Latent Attention, MLA)的高级架构——推荐使用混合并行策略: - 对于注意力层,使用 数据并行(Data Parallelism, DP),这些层会在各设备间复刻,并处理不同的批次。 - 对于专家层,使用 专家并行或张量并行(Expert or Tensor Parallelism, EP/TP),这些层会在设备间分片,从而分担计算。
这种划分使得注意力层能够在数据并行(DP)组内复制,从而能够独立处理不同的批次。同时,专家层通过专家或张量并行(DP*TP)在设备间进行分区(切片),最大化硬件利用率和效率。
在这些情况下,数据并行的各个 rank 不是完全独立的,前向传播必须对齐,并且所有 rank 上的专家层在每次前向传播时都需要同步,即使待处理的请求数量少于 DP rank 的数量。
对于 MoE 模型,当任何一个 rank 有请求正在进行时,必须确保所有当前没有请求的 rank 都执行空的“虚拟”前向传播。这是通过一个单独的 DP Coordinator 协调器进程来实现的,该进程与所有 rank 通信,并且每隔 N 步执行一次集体操作,以判断所有 rank 是否都处于空闲状态并可以暂停。当 TP 与 DP 结合使用时,专家层会组成一个规模为(DP x TP)的 EP 或 TP 组。
验证多节点通信环境#
物理层要求:#
物理机器必须位于同一个 WLAN 中,并且具有网络连接。
所有 NPU 都通过光模块连接,且连接状态必须正常。
验证流程:#
在每个节点上依次执行以下命令。所有结果必须为 success 且状态必须为 UP:
 # Check the remote switch ports
 for i in {0..7}; do hccn_tool -i $i -lldp -g | grep Ifname; done
 # Get the link status of the Ethernet ports (UP or DOWN)
 for i in {0..7}; do hccn_tool -i $i -link -g ; done
 # Check the network health status
 for i in {0..7}; do hccn_tool -i $i -net_health -g ; done
 # View the network detected IP configuration
 for i in {0..7}; do hccn_tool -i $i -netdetect -g ; done
 # View gateway configuration
 for i in {0..7}; do hccn_tool -i $i -gateway -g ; done
 # View NPU network configuration
 cat /etc/hccn.conf
NPU 互连验证:#
1. Get NPU IP Addresses#
for i in {0..7}; do hccn_tool -i $i -ip -g | grep ipaddr; done
2. Cross-Node PING Test#
# Execute on the target node (replace with actual IP)
hccn_tool -i 0 -ping -g address 10.20.0.20
用 docker 运行#
假设你有两台 Atlas 800 A2(64G*8)节点,并且想要在多节点上部署 deepseek-v3-w8a8 量化模型。
# Update the vllm-ascend image
export IMAGE=m.daocloud.io/quay.io/ascend/vllm-ascend:v0.9.1
export NAME=vllm-ascend

# Run the container using the defined variables
# Note if you are running bridge network with docker, Please expose available ports for multiple nodes communication in advance
docker run --rm \
--name $NAME \
--net=host \
--device /dev/davinci0 \
--device /dev/davinci1 \
--device /dev/davinci2 \
--device /dev/davinci3 \
--device /dev/davinci4 \
--device /dev/davinci5 \
--device /dev/davinci6 \
--device /dev/davinci7 \
--device /dev/davinci_manager \
--device /dev/devmm_svm \
--device /dev/hisi_hdc \
-v /usr/local/dcmi:/usr/local/dcmi \
-v /usr/local/Ascend/driver/tools/hccn_tool:/usr/local/Ascend/driver/tools/hccn_tool \
-v /usr/local/bin/npu-smi:/usr/local/bin/npu-smi \
-v /usr/local/Ascend/driver/lib64/:/usr/local/Ascend/driver/lib64/ \
-v /usr/local/Ascend/driver/version.info:/usr/local/Ascend/driver/version.info \
-v /etc/ascend_install.info:/etc/ascend_install.info \
-v /mnt/sfs_turbo/.cache:/root/.cache \
-e VLLM_USE_V1=1 \
-it $IMAGE bash
备注
在启动推理服务器之前,确保已经为多节点通信设置了一些环境变量。
分别在两台节点上运行以下脚本
节点0
#!/bin/sh

# this obtained through ifconfig
# nic_name is the network interface name corresponding to local_ip
nic_name="xxxx"
local_ip="xxxx"

export HCCL_IF_IP=$local_ip
export GLOO_SOCKET_IFNAME=$nic_name
export TP_SOCKET_IFNAME=$nic_name
export HCCL_SOCKET_IFNAME=$nic_name
export OMP_PROC_BIND=false
export OMP_NUM_THREADS=100
export HCCL_BUFFSIZE=1024

# The w8a8 weight can obtained from https://www.modelscope.cn/models/vllm-ascend/DeepSeek-V3-W8A8
# If you want to the quantization manually, please refer to https://vllm-ascend.readthedocs.io/en/v0.9.1-dev/user_guide/feature_guide/quantization.html
vllm serve /root/.cache/ds_v3 \
--host 0.0.0.0 \
--port 8004 \
--data-parallel-size 4 \
--data-parallel-size-local 2 \
--data-parallel-address $local_ip \
--data-parallel-rpc-port 13389 \
--tensor-parallel-size 4 \
--seed 1024 \
--served-model-name deepseek_v3 \
--enable-expert-parallel \
--max-num-seqs 16 \
--max-model-len 32768 \
--quantization ascend \
--max-num-batched-tokens 4096 \
--trust-remote-code \
--no-enable-prefix-caching \
--gpu-memory-utilization 0.9 \
--additional-config '{"ascend_scheduler_config":{"enabled":true},"torchair_graph_config":{"enabled":true}}'
节点1
#!/bin/sh

nic_name="xxx"
local_ip="xxx"

export HCCL_IF_IP=$local_ip
export GLOO_SOCKET_IFNAME=$nic_name
export TP_SOCKET_IFNAME=$nic_name
export HCCL_SOCKET_IFNAME=$nic_name
export OMP_PROC_BIND=false
export OMP_NUM_THREADS=100
export VLLM_USE_V1=1
export HCCL_BUFFSIZE=1024

vllm serve /root/.cache/ds_v3 \
--host 0.0.0.0 \
--port 8004 \
--headless \
--data-parallel-size 4 \
--data-parallel-size-local 2 \
--data-parallel-start-rank 2 \
--data-parallel-address { node0 ip } \
--data-parallel-rpc-port 13389 \
--tensor-parallel-size 4 \
--seed 1024 \
--quantization ascend \
--served-model-name deepseek_v3 \
--max-num-seqs 16 \
--max-model-len 32768 \
--max-num-batched-tokens 4096 \
--enable-expert-parallel \
--trust-remote-code \
--no-enable-prefix-caching \
--gpu-memory-utilization 0.92 \
--additional-config '{"ascend_scheduler_config":{"enabled":true},"torchair_graph_config":{"enabled":true}}'
The Deployment view looks like:
一旦你的服务器启动,你可以通过输入提示词来查询模型:
curl http://{ node0 ip:8004 }/v1/completions \
    -H "Content-Type: application/json" \
    -d '{
        "model": "/root/.cache/ds_v3",
        "prompt": "The future of AI is",
        "max_tokens": 50,
        "temperature": 0
    }'
运行基准测试#
详细信息请参阅 benchmark
vllm bench serve --model /root/.cache/ds_v3  --served-model-name deepseek_v3 \
--dataset-name random --random-input-len 128 --random-output-len 128 \
--num-prompts 200  --trust-remote-code --base-url "http://{ node0 ip }:8004" --request-rate 1