多节点测试
多节点CI旨在测试超大规模模型的分布式场景,例如跨多节点的disaggregated_prefill多DP等。
工作原理
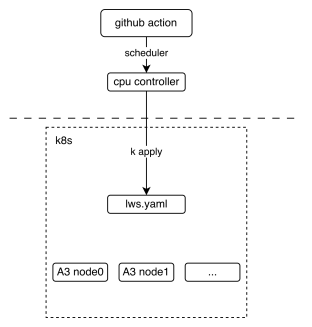
下图展示了多节点CI机制的基本部署视图,说明了GitHub Action如何与lws(一种Kubernetes CRD资源)进行交互。
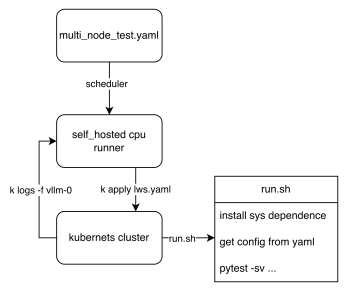
From the workflow perspective, we can see how the final test script is executed. The key point is that the shared files tests/e2e/common/multi_node/lws.yaml.jinja2 and tests/e2e/common/multi_node/run.sh define the cluster template and pod entry script. Each node executes different logic according to the LWS_WORKER_INDEX environment variable, so that multiple nodes can form a distributed cluster to perform tasks. run.sh launches the common pytest entrypoint, which reads dp_load_balancing from the config and delegates to internal_dp/test_multi_node.py or external_dp/test_external_dp.py.
如何贡献
-
上传自定义权重
如果您需要自定义权重,例如为DeepSeek-V3量化了w8a8权重并希望在CI上运行,欢迎将权重上传至ModelScope的vllm-ascend组织。如果您没有上传权限,请联系@Potabk
-
添加配置文件yaml
Add the config YAML under
tests/e2e/cases/models/configs/<model-family>/and pass that directory throughconfig_base_pathin the workflow orCONFIG_BASE_PATHlocally. Setdp_load_balancingin the YAML tointernalorexternalto select the corresponding runtime.假设您有2个节点运行1P1D配置(1个Prefiller + 1个Decoder):
您可以添加如下所示的配置文件:
test_name: "test DeepSeek-V3 disaggregated_prefill" # the model being tested model: "vllm-ascend/DeepSeek-V3-W8A8" # how large the cluster is num_nodes: 2 npu_per_node: 16 # All env vars you need should add it here env_common: &env_common VLLM_USE_MODELSCOPE: true OMP_PROC_BIND: false OMP_NUM_THREADS: 100 HCCL_BUFFSIZE: 1024 SERVER_PORT: 8080 disaggregated_prefill: enabled: true # node index(a list) which meet all the conditions: # - prefiller # - no headless(have api server) prefiller_host_index: [0] # node index(a list) which meet all the conditions: # - decoder decoder_host_index: [1] # Add each node's vllm serve cli command just like you run locally # Add each node's individual envs like follow deployment: - name: prefiller node # optional: just for description, not used in code envs: <<: *env_common # Continue to add other envs if needed server_cmd: > vllm serve ... - name: decoder node # optional: just for description, not used in code envs: <<: *env_common # Continue to add other envs if needed server_cmd: > vllm serve ... benchmarks: perf: # fill with performance test kwargs acc: # fill with accuracy test kwargs -
将用例添加到夜间工作流
目前,多节点测试工作流定义在.github/workflows/schedule_nightly_test_a3.yaml中。
multi-node-tests:
  name: multi-node
  if: always() && (github.event_name == 'schedule' || github.event_name == 'workflow_dispatch')
  strategy:
    fail-fast: false
    max-parallel: 1
    matrix:
      test_config:
        - name: multi-node-deepseek-pd
          config_file_path: DeepSeek-V3.yaml
          config_base_path: tests/e2e/cases/models/configs/DeepSeek
          size: 2
        - name: multi-node-qwen3-vl-dp
          config_file_path: Qwen3-VL-235B-disagg-pd.yaml
          config_base_path: tests/e2e/cases/models/configs/Qwen
          size: 2
        - name: GLM5_1-W8A8-EP-external
          config_file_path: GLM5_1-W8A8-EP-external.yaml
          config_base_path: tests/e2e/cases/models/configs/GLM
          size: 4
  uses: ./.github/workflows/_e2e_nightly_multi_node.yaml
  with:
    soc_version: a3
    runner: linux-aarch64-a3-800t-0
    image: 'swr.cn-southwest-2.myhuaweicloud.com/base_image/ascend-ci/vllm-ascend:nightly-a3'
    replicas: 1
    size: ${{ matrix.test_config.size }}
    config_file_path: ${{ matrix.test_config.config_file_path }}
    config_base_path: ${{ matrix.test_config.config_base_path || '' }}
    name: ${{ matrix.test_config.name }}
  secrets:
    KUBECONFIG_B64: ${{ secrets.KUBECONFIG_B64 }}
The matrix above defines all the parameters required to add a multi-machine use
case. The parameters worth noting are size, config_file_path, and
config_base_path. size defines the number of nodes required for your use
case. config_file_path is the yaml file name, and config_base_path tells the
loader which model-family directory contains the config. Every entry should set
config_base_path; the YAML's dp_load_balancing field selects the internal or
external DP runtime.
本地运行多节点测试
1. 使用Kubernetes
本节假设您本地已具备Kubernetes NPU集群环境。然后您可以一键轻松启动测试。
-
步骤1. 安装LWS CRD资源
-
步骤2. 根据需要部署以下yaml文件
lws.yamlapiVersion: leaderworkerset.x-k8s.io/v1 kind: LeaderWorkerSet metadata: name: test-server namespace: vllm-project spec: replicas: 1 leaderWorkerTemplate: size: 2 restartPolicy: None leaderTemplate: metadata: labels: role: leader spec: containers: - name: vllm-leader imagePullPolicy: Always image: swr.cn-southwest-2.myhuaweicloud.com/base_image/ascend-ci/vllm-ascend:nightly-a3 env: - name: CONFIG_YAML_PATH value: DeepSeek-V3.yaml - name: CONFIG_BASE_PATH value: tests/e2e/cases/models/configs/DeepSeek - name: WORKSPACE value: "/vllm-workspace" - name: FAIL_TAG value: FAIL_TAG command: - sh - -c - | bash /vllm-workspace/vllm-ascend/tests/e2e/common/multi_node/run.sh resources: limits: huawei.com/ascend-1980: 16 memory: 512Gi ephemeral-storage: 100Gi requests: huawei.com/ascend-1980: 16 memory: 512Gi ephemeral-storage: 100Gi cpu: 125 ports: - containerPort: 8080 # readinessProbe: # tcpSocket: # port: 8080 # initialDelaySeconds: 15 # periodSeconds: 10 volumeMounts: - mountPath: /root/.cache name: shared-volume - mountPath: /usr/local/Ascend/driver/tools name: driver-tools - mountPath: /dev/shm name: dshm volumes: - name: dshm emptyDir: medium: Memory sizeLimit: 15Gi - name: shared-volume persistentVolumeClaim: claimName: nv-action-vllm-benchmarks-v2 - name: driver-tools hostPath: path: /usr/local/Ascend/driver/tools workerTemplate: spec: containers: - name: vllm-worker imagePullPolicy: Always image: swr.cn-southwest-2.myhuaweicloud.com/base_image/ascend-ci/vllm-ascend:nightly-a3 env: - name: CONFIG_YAML_PATH value: DeepSeek-V3.yaml - name: CONFIG_BASE_PATH value: tests/e2e/cases/models/configs/DeepSeek - name: WORKSPACE value: "/vllm-workspace" - name: FAIL_TAG value: FAIL_TAG command: - sh - -c - | bash /vllm-workspace/vllm-ascend/tests/e2e/common/multi_node/run.sh resources: limits: huawei.com/ascend-1980: 16 memory: 512Gi ephemeral-storage: 100Gi requests: huawei.com/ascend-1980: 16 ephemeral-storage: 100Gi cpu: 125 volumeMounts: - mountPath: /root/.cache name: shared-volume - mountPath: /usr/local/Ascend/driver/tools name: driver-tools - mountPath: /dev/shm name: dshm volumes: - name: dshm emptyDir: medium: Memory sizeLimit: 15Gi - name: shared-volume persistentVolumeClaim: claimName: nv-action-vllm-benchmarks-v2 - name: driver-tools hostPath: path: /usr/local/Ascend/driver/tools --- apiVersion: v1 kind: Service metadata: name: vllm-leader namespace: vllm-project spec: ports: - name: http port: 8080 protocol: TCP targetPort: 8080 selector: leaderworkerset.sigs.k8s.io/name: vllm role: leader type: ClusterIP验证 Pod 的状态:
应得到类似如下的输出:
验证分布式推理是否正常工作:
应得到类似如下的结果:
INFO 12-30 11:00:57 [__init__.py:43] Available plugins for group vllm.platform_plugins:
INFO 12-30 11:00:57 [__init__.py:45] - ascend -> vllm_ascend:register
INFO 12-30 11:00:57 [__init__.py:48] All plugins in this group will be loaded. Set `VLLM_PLUGINS` to control which plugins to load.
INFO 12-30 11:00:57 [__init__.py:217] Platform plugin ascend is activated
INFO 12-30 11:00:57 [importing.py:68] Triton not installed or not compatible; certain GPU-related functions will not be available.
================================================================================================== test session starts ===================================================================================================
platform linux -- Python 3.12.13, pytest-8.4.2, pluggy-1.6.0 -- /usr/local/python3.12.13/bin/python3
cachedir: .pytest_cache
rootdir: /vllm-workspace/vllm-ascend
configfile: pyproject.toml
plugins: cov-7.0.0, asyncio-1.3.0, mock-3.15.1, anyio-4.12.0
asyncio: mode=Mode.STRICT, debug=False, asyncio_default_fixture_loop_scope=None, asyncio_default_test_loop_scope=function
collected 1 item

tests/e2e/common/multi_node/internal_dp/test_multi_node.py::test_multi_node [2025-12-30 11:01:01] INFO multi_node_config.py:294: Loading config yaml: tests/e2e/cases/models/configs/DeepSeek/DeepSeek-V3.yaml
[2025-12-30 11:01:01] INFO multi_node_config.py:348: Resolving cluster IPs via DNS...
[2025-12-30 11:01:01] INFO multi_node_config.py:212: Node 0 envs: {'VLLM_USE_MODELSCOPE': 'True', 'OMP_PROC_BIND': 'False', 'OMP_NUM_THREADS': '100', 'HCCL_BUFFSIZE': '1024', 'SERVER_PORT': '8080', 'NUMEXPR_MAX_THREADS': '128', 'DISAGGREGATED_PREFILL_PROXY_SCRIPT': 'examples/disaggregated_prefill_v1/load_balance_proxy_server_example.py', 'HCCL_IF_IP': '10.0.0.102', 'HCCL_SOCKET_IFNAME': 'eth0', 'GLOO_SOCKET_IFNAME': 'eth0', 'TP_SOCKET_IFNAME': 'eth0', 'LOCAL_IP': '10.0.0.102', 'NIC_NAME': 'eth0', 'MASTER_IP': '10.0.0.102'}
[2025-12-30 11:01:01] INFO multi_node_config.py:159: Launching proxy: python examples/disaggregated_prefill_v1/load_balance_proxy_server_example.py --host 10.0.0.102 --port 6000 --prefiller-hosts 10.0.0.102 --prefiller-ports 8080 --decoder-hosts 10.0.0.138 --decoder-ports 8080
[2025-12-30 11:01:01] INFO conftest.py:107: Starting server with command: vllm serve vllm-ascend/DeepSeek-V3-W8A8 --host 0.0.0.0 --port 8080 --data-parallel-size 2 --data-parallel-size-local 2 --tensor-parallel-size 8 --seed 1024 --enforce-eager --enable-expert-parallel --max-num-seqs 16 --max-model-len 8192 --max-num-batched-tokens 8192 --quantization ascend --trust-remote-code --no-enable-prefix-caching --gpu-memory-utilization 0.9 --kv-transfer-config {"kv_connector": "MooncakeConnectorV1", "kv_role": "kv_producer", "kv_port": "30000",
"kv_connector_extra_config": {
        "prefill": {
                "dp_size": 2,
                "tp_size": 8
        },
        "decode": {
                "dp_size": 2,
                "tp_size": 8
        }
    }
}
2. 不使用 Kubernetes 进行测试
The same tests/e2e/common/multi_node/run.sh entrypoint can be used
on prepared bare-metal or container hosts. Without LWS, set the values that
Kubernetes normally injects yourself:
- 配置文件 yaml 中的
cluster_hosts,使用每个节点均可访问的 IP。 - 每个节点上的
LWS_WORKER_INDEX,从0开始。 CONFIG_YAML_PATH作为配置文件名,CONFIG_BASE_PATH作为配置目录。
使用可以互相访问的主机网卡 IP,例如通过 ip addr 或 ifconfig 在活动网络接口上显示的地址。
不要使用每个主机的 Docker 桥接地址,例如 172.17.0.1,因为每个主机都有自己的本地桥接。
在提交 PR 之前,应移除本地的 cluster_hosts 编辑,除非这些主机是已提交测试环境的一部分。
2.1 内部 DP 本地运行
2.1.1 添加集群主机
编辑你想要运行的内部 DP 配置,例如:
将 cluster_hosts 添加为顶级字段,例如放在 num_nodes 和 npu_per_node 附近:
2.1.2 准备环境
在每个集群主机上安装 vllm-ascend 开发依赖:
在第一个主机(即 LWS_WORKER_INDEX=0 的节点)上安装 AISBench:
export AIS_BENCH_TAG="v3.1-20260912-master"
export AIS_BENCH_URL="https://github.com/AISBench/benchmark.git"
export BENCHMARK_HOME=/vllm-workspace/vllm-ascend/benchmark

git clone -b ${AIS_BENCH_TAG} --depth 1 ${AIS_BENCH_URL} $BENCHMARK_HOME
cd $BENCHMARK_HOME
pip install -e . -r requirements/api.txt -r requirements/extra.txt -r requirements/response_anomaly.txt
如果你的本地镜像已经包含了模型、基准数据、Ascend 运行时和 AISBench,你只需要下一步中的运行时导出。
2.1.3 启动每个节点
在每个节点上分别运行脚本。先启动工作节点,然后启动节点 0。
在节点 1 上:
export WORKSPACE=/vllm-workspace
export IS_PR_TEST=false
export CONFIG_YAML_PATH=DeepSeek-V3.yaml
export CONFIG_BASE_PATH=tests/e2e/cases/models/configs/DeepSeek
export LWS_WORKER_INDEX=1

cd $WORKSPACE/vllm-ascend
bash tests/e2e/common/multi_node/run.sh
在节点 0 上:
export WORKSPACE=/vllm-workspace
export IS_PR_TEST=false
export CONFIG_YAML_PATH=DeepSeek-V3.yaml
export CONFIG_BASE_PATH=tests/e2e/cases/models/configs/DeepSeek
export LWS_WORKER_INDEX=0

cd $WORKSPACE/vllm-ascend
bash tests/e2e/common/multi_node/run.sh
内部 DP 日志主要打印到运行 run.sh 的终端。当设置了 LOG_PREFIX 时,共享脚本还会将 Ascend 日志备份到:
2.2 外部 DP 本地运行
2.2.1 添加集群主机
编辑你想要运行的外部 DP 配置。例如:
将 cluster_hosts 添加为顶级字段,例如放在 num_nodes 和 npu_per_node 附近:
2.2.2 准备环境
在每个集群主机上安装 vllm-ascend 开发依赖:
在节点 0 上安装 AISBench:
export AIS_BENCH_TAG="v3.1-20260912-master"
export AIS_BENCH_URL="https://github.com/AISBench/benchmark.git"
export BENCHMARK_HOME=/vllm-workspace/vllm-ascend/benchmark

git clone -b ${AIS_BENCH_TAG} --depth 1 ${AIS_BENCH_URL} $BENCHMARK_HOME
cd $BENCHMARK_HOME
pip install -e . -r requirements/api.txt -r requirements/extra.txt -r requirements/response_anomaly.txt
如果你的本地镜像已经包含了模型、基准数据、Ascend 运行时和 AISBench,你只需要下一步中的运行时导出。
2.2.3 启动每个节点
External DP uses the same shared run.sh. Set CONFIG_BASE_PATH to the model
family directory containing the config. The config's dp_load_balancing field
selects external_dp/test_external_dp.py.
然后先启动非主节点,最后启动节点 0。以下示例使用 GLM5_1-W8A8-EP-external.yaml,这是一个 4 节点分离式预填充案例。
在节点 1、节点 2 和节点 3 上,设置匹配的 LWS_WORKER_INDEX:
export WORKSPACE=/vllm-workspace
export IS_PR_TEST=false
export CONFIG_BASE_PATH=tests/e2e/cases/models/configs/GLM
export CONFIG_YAML_PATH=GLM5_1-W8A8-EP-external.yaml
export LWS_WORKER_INDEX=1  # Use 2 on node 2, and 3 on node 3.

cd $WORKSPACE/vllm-ascend
bash tests/e2e/common/multi_node/run.sh
在节点 0 上:
export WORKSPACE=/vllm-workspace
export IS_PR_TEST=false
export CONFIG_BASE_PATH=tests/e2e/cases/models/configs/GLM
export CONFIG_YAML_PATH=GLM5_1-W8A8-EP-external.yaml
export LWS_WORKER_INDEX=0

cd $WORKSPACE/vllm-ascend
bash tests/e2e/common/multi_node/run.sh
对于 GLM5_1-W8A8-EP-external.yaml,节点 0 和节点 1 启动预填充器 rank,节点 2 和节点 3 启动解码器 rank,节点 0 还启动代理和基准测试。
2.2.4 在测试运行时读取日志
运行 run.sh 的终端会打印 pytest 编排日志。对于外部 DP,AISBench 输出也会打印在节点 0 上,而 rank 和代理的 stdout/stderr 则写入 EXTERNAL_DP_LOG_DIR。默认布局为:
每个 rank 日志的第一行记录了用于启动该 rank 的确切命令和环境。proxy.log 仅存在于配置的代理节点上,通常是节点 0。
在运行多个本地实验时,使用单独的日志目录:
要实时查看日志,请在相应节点上的另一个终端中运行以下命令: